Cross Coast Construction

Commercial & Residential

  • HOME
  • About
  • Services
  • Commercial
  • Residential
  • Testimonials
  • Blog
  • Contact

Window replace in cement block building

November 17, 2020 By Cross Coast Contractor Leave a Comment

If you have a cement block home and you want to replace your windows with out damaging the interior window sill or jambs try the following steps.
1 Meet with window sales person to make sure the replacements will work in the rough opening ,RO, of the windows you wish to replace.

2 Remove all interior window treatments. Then using a razor knife cut the caulk / sealant all around the perimeter. Do not remove sill.

3 On the exterior remove stucco / cement all round the perimeter. Hint use a straight edge to mark a line 1/16-1/8″ from corner on the exterior building wall. Then cut 1/4″ deep on that line.

4 Chip away stucco from the wall corner to the window flange / frame.

5 Remove the glass. Most operable windows you can remove the glass with its frame leaving only the main jamb, head and sill in place. Remove the screws holding the jamb.

6 Using a large crow bar put the bar lip against the jamb ( long side) at dead center and work the bar under the jamb until the jamb starts to buckle inward.

7 Do the same on the other side.

8 Do the same on the head and sill but don’t buckle as much yet.

9 Now you can force the jambs inward to the point the head and sill begin to move away from the RO. The RO is the building it self with or with out bucks.

10 Once the window frame is completely out you can replace the wood bucks if applicable or renail them to the building.

11 Clean up the entire area and seal the perimeter with caulk or sealant before installing new window.

12 Depending on the windows you will be installing determines installation steps.

13  If new windows are flange type and your Tip to Tip measurements allow a slip in fit great if not you might have to trim some of the flange. Minimal trim please.

14 Apply caulk / sealant to the flange and install window. Some one needs to hold it while another inside installs the screws.

15 If you removed the stucco / cement as instructed then you should have a clean edge all around the perimeter.

15 Apply bonding agent to all exposed block and cement.

16 I’m not going to tell you how to apply the stucco only that you have a straight edge to help you guide the concrete finishing trowel  while applying the material at a slight angle from the Wall edge to the flange of the installed window.

17 Don’t let it dry and crack, use a masons sponge float to dress up and moisten the stucco, don’t get carried away and wash it all out.

18 When dry apply another bead of caulk / sealant around the perimeter on the outside and inside.

19 Your interior window jamb and sill should be intact as if nothing was done. Good Luck
Filed Under: Uncategorized

Indian Bobber Project

April 12, 2017 By Cross Coast Contractor 1 Comment

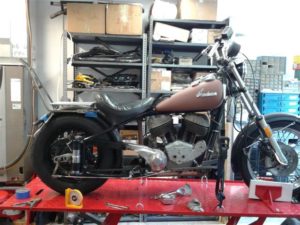
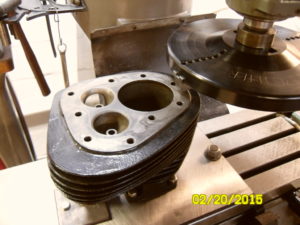
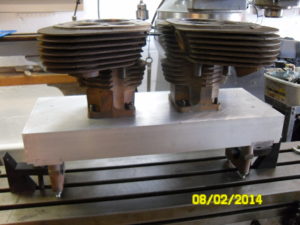
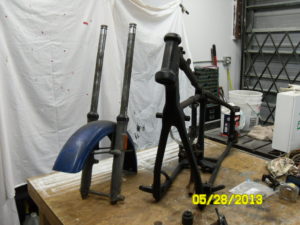
Was at Daytona Beach this past Bike Week 2017 for the AMCA and other swap meets. Stayed at my long time friends house Kevin. Before arriving at his house I stopped at the Vintage Japanese MC meet at the Eustis Fairgrounds where I ran into ED, Kevin introduced Ed and his wife Ginger to me last year. Really nice people. Ed amazes the shit out of me with the things he does with these old motorcycles mostly due to my own inability to think out of the box. I just keep doing things by the book, I’ll get over that some day. So there wasn’t much to buy this year, very disappointed but I did pick up a HD chain guard which when cut and welded to a butchered original Indian chain guard is working perfectly. Few other items I bought were cycle electric generator, repo shift knobs, cam cover, tail lens, used drive bearing race, HD CV carb, HD kickstand, HD turn lights, and a broken helper seat spring bar with adjusters. In keeping with my promised to my self to get this bike on the road this year I got right to it when I got home. The pictures below show the Indian frame 1948 and front end HD 1977 FX in 2013. I ended up buying another front end 1982 HD FXR because it was complete and what the heck the price was right. The picture second from left is this past week 4/9/17 . Its in mock up stage, motor is empty, not the one to be rebuilt that honor goes to a 80″ 1948 motor that belongs to another bike, yet to be restored. It has taken a while to get to this point because as I am repairing/rebuilding the various broken and rusted parts I also am manufactured fixtures for everything from proper wheel lacing offset to cylinder support plate for mounting to mill or Sunnen boring machine. Two examples below. I also have been investing in all the correct tooling for honing and measuring bores. The next motor will come together much quicker. Gotta go for now. Don’t TEXT and drive. Or ride, I saw a young guy doing this recently.


.

Filed Under: Uncategorized

Prehung door install

April 2, 2017 By Cross Coast Contractor Leave a Comment

How to install a prehung door unit into an existing rough opening. First lets become familiar with the parts of the unit. The DOOR is the slab of wood, metal or plastic usually flat or with decorative molding. It attaches to the JAMB by way of HINGES to a jamb LEG. There are 2 LEGS one for the hinges and one for the STRIKER PLATE. The jamb is made up of a jamb HEAD, 2 LEGS and sometimes a SILL. The unit which comes preassembled installs as one piece into the wall rough opening. There are 2 ways you can install the unit into the opening, 1 with casing (the TRIM) attached to the hinge / striker plate side of the jamb or 2 with out the trim.

For ease and clarity our sample prehung unit will be a 2868 hollow core interior unit, like the ones you see at the big box home supply houses. These are by far the lightest, and easiest to install and very popular. 2868 = door unit is a 2′-6″ X 6′-8″ , 3068 = is a 3′ -0″ X 6′-8″ got the idea?

I personally like to attach casing to the jamb on one side and install. Start by setting a tri-square to 3/16″ and on inside of jamb edges  mark full length of legs and head both sides.

Step 1 check floor and head of rough opening for level.

Step 2 check left and right vertical framing in rough opening for plumb.

Step 3 if floor and head are perfect level then measure OAH (over all height) then subtract 1/4″-1/2″ from prehung unit legs OAH and cut. Now the unit should slip into opening with gap at top.

Step 4 attach casing to hinge/striker plate side, and head of jamb using 4P finish nails, make sure to hold casing 3/16″ off from the inside of jamb all around.

Step 5 place unit in wall rough opening till casing is against drywall. Have some one hold the unit from falling out and step back. At this point your looking for an even reveal (the 1/8″ or so between the door slab and the jamb).

Step 6 read step 19 before continuing. Adjust unit in rough opening so reveal is equal and uniform across the head and down the striker plate side jamb leg using your thumb or palm by pushing against the jamb edge where casing is attached. If you can achieve this, good because you can now attach unit to opening. Sub-note what you want is the hinge side plumb and the reveal along the top even.  Attaching casing to wall at the top of hinge side about 6″ down will allow you to adjust striker side and head with out unit falling out on you. Attach by nailing 6P finish nail but do not set the nail you may have to remove it.

Step 7 with hinge side plum (that’s level in the vertical) attach bottom casing to wall same as you did at the top, check for plumb and casing flush against wall full length.

Step 8 with palm of your hand push up on jamb head at striker side until the reveal is even across the top from left to right tack casing to wall at top.

Step 9 with door in closed position check reveal at top left jamb leg and make it the same at the bottom tack to wall. The next step is very important.

Step 10 using your thumb push against door slab at the top corner on the striker side until the door slab is flush with the jamb not the casing. look at the bottom, is the door slab flush with the jamb or is it inside or outside of the jamb? If flush good add nail to bottom casing, if not go the next step.

Step 11 jamb not flush at bottom. You should have three 6P nails in the door casing 1 at top and bottom hinge side and 1 at top striker side. If bottom door at jamb is in move top of jamb out until slab is flush top to bottom. If bottom door at jamb is out move bottom of jamb in if you can until slab is flush top and bottom or move top of hinge side out until slab is flush  top and bottom. All the while keep mindful of the reveal on both sides and top.

Step 12 If you wondering why shims have not been mention it is because these door units do not need to be shimmed. They will work fine hanging on the casing because they are that lite.

Step 13 if reveal is close to equal and door slab is flush then add 6P nails spaced 12″ apart down the hinge side casing, down the striker side casing (adjusting reveal as you work your way down by pushing or pulling casing) then the head.

Step 14 step back and look at the door. Make sure all is correct. Open door make sure door swings properly and does not want to open or close on its own.

Step 15 trim the other side to the jamb first with 4P nails, hold on the line 3/16″ in you made earlier.

Step 16 before  nailing casing to wall (same procedure as outlined above) start at top install 6P nail at each side, the jamb head will hold the jamb square to opening.

Step 17 hing side at bottom start nail with in 6″ from floor but don’t drive in until you make sure the jamb is square to the opening. Finish nailing hinge side top to bottom.

Step 18 measure between jambs at top and ideally when tacked at bottom will be the same between jambs,  follow steps in step 17, then nail head casing.

Step 19 if all looks and operates correctly then finish nailing 6P nails flush with casing both sides.

Step 20 use latex caulk at casing to jamb and casing to wall all the way around both sides. When dry the light-weight hollow core prehung unit will be locked in place ready for paint. Your finished.

Filed Under: Uncategorized

Pressure is on to post!

March 22, 2017 By Cross Coast Contractor Leave a Comment

I have this Indian motorcycle and its an old one. I have had it 37 years rode it half that time because I never fixed it right when it broke and it always broke. When I was younger I would get a six pack and rebuild what ever was broke on the living room floor in the middle of the night. Sure it ran the next day but it would break again with in a year. This story would repeat over and over as the time between repairs got longer and longer. I eventually bought a Honda just to have a ride. Mean while I have built up a repair shop dedicated to the Indians only. Old ones that is. Don’t have customers yet because I have a few of my own that need restored before I touch a customers. We need a good Indian motor rebuild shop here in south Florida one with the correct machine tooling to do the job right the first time and that is my goal. Almost there, first one will be on the road this year and will be titled 1948 Chief. Its actually going to be a build from all the damaged and extra pieces laying around that don’t go to one of the basket cases I have. It will be a rider made for long trips because I bought reproduction oversize gas tanks for it. Chassis is 80%, motor just getting started. I’ll post pictures soon as I figure out how to do it. Until then. Don’t TEXT and drive.

Filed Under: Uncategorized

Getting Started

February 28, 2016 By Cross Coast Contractor Leave a Comment

Getting Started!

I have waited too long to start this blog. Like so many projects around the house getting started when your not sure what to do is the biggest hurtle. Even simple repairs stop people in their tracks when their not sure what to do. Thank God for YouTube and other blogs which have helped me. Building renovation and repairs are my specialty.

A little history on me. I am 3 years in to my second career as a Building Inspector for a local municipality. Prior to that, my first career was 37 years in the construction and renovation industry. It is my hope to become a regular contributor to this page with helpful tips and suggestions to help you get started with your scary home project.

I have started.


Filed Under: Uncategorized

Contact Us

Name (required)

Email

Phone (required)

Subject

Please answer the following (required)

Message

Copyright © 2025 - crosscoastconstruction.com